Tuesday, July 12, 2011

Cinnamon Rolls

Today I made a batch of cinnamon rolls! Okay, so it's not a new recipe, but I've been meaning to make Kyle some for a while. My sister-in-law gave me the recipe, which is supposed to be a copycat of Cinnabon. I've tried making other kinds, but these are still Kyle's favorite, so they're the only ones I make now. :) Sometimes they turn out big and soft, other times not so much...hmmm...will have to figure out what I do differently each time. But today's looked okay, so I took a few pictures. :)

Getting the dough ready to roll. Notice the big bowl of cinnamon sugar, right next to the melted butter! I'm a big believer that desserts are not supposed to be healthy. :)

Spreading a nice thick layer of butter and brown sugar/cinnamon!


Then rolling up the dough and cutting it into 12 pieces


Waiting for them to bake! I don't actually like cinnamon rolls, but I LOVE the smell of them baking!

They're done--after adding a thick topping of cream cheese icing! Ready for dessert, Kyle? :)


Friday, July 8, 2011

Baby Gifts

I decided to set a goal of making one project per week, at least for the summer. I think I'll make a list later of some things I want to try making and then go through them one at a time. It'll include sewing projects, scrapbooking pages from vacations and Parker's baby book, and trying new recipes!
The first thing made was my reversible bag. I was using it this week and really like it--it's the perfect size!
This week my project was a baby gift. A friend Kyle went to school with is having a baby boy this Fall, so Kyle asked if I could make a few baby items as a gift for him. I love making baby stuff! (And I love that Kyle likes my sewing enough to want it for a gift!) :) Have I mentioned that I'm married to the most wonderful guy ever??
Anyway, I got out my little stash of flannel and we looked through the prints I had. I asked Kyle if he wanted to pick something out, since it was for his friend. He chose a light blue construction print and a green turtle print--both super cute. We decided that I'd make two burp cloths, a bib and a few peepee teepees out of each fabric.
Here is the finished set:


Now we just have to find a baby card and put it in the mail! I hope they like it!

Tuesday, July 5, 2011

Reversible bag

Ever find patterns that you want to make, only to set them aside and not actually use them? Me too! :) I've found a few sewing patterns online that I've been wanting to try, but I never have the right kind of fabric or a big block of time to work on them, so into my pattern file they go, where they may or may not be seen again.

Then a few weeks ago I saw that a friend had made herself a purse and it was super cute! I was inspired! I got home and looked for a pattern I had printed out for a small reversible purse. I still wasn't sure what kind of fabric I wanted, but I decided that I WAS going to sew a bag, even if I had to spend an hour at Joann's choosing a color for it (fortunately for Parker it didn't take that long). I looked through my own fabric first, but the only thing I had that would work was a huge chunk of black fabric. I have absolutely no idea where it came from...or even what type of fabric it is. I didn't buy it and I don't remember anyone giving it to me...But there are close to three yards of it so I figured I could mess up the pattern about eight times and still have enough for another purse. :) So off to Joann's I went, with Parker, of course, to find something for the lining. I saw a couple that would work and was trying to decide between them when I came across a blue/gray colored cotton with a black floral print. Perfect! I got a yard of that and came home.

The pics are a little dark, but here are the fabrics I used.


I used a pattern from a blog that I found a while ago while looking up purse/tote patterns. Here's the link: http://verypurpleperson.com/2010/04/reversible-bag-pattern.html

I forgot to take pictures while I was sewing, but here are some of the finished bag. It was really easy but it took a little time to sew as it had to be pressed, pinned and have darts sewn in. It was a fun little project and only took a few hours from start to finish.


For my first attempt, it turned out not bad! :)

Tuesday, June 14, 2011

Cake Pops

Okay, so technically they're cake balls since I didn't put them on sticks.... :) Whatever you want to call them, they were my newest baking adventure.

I had a lot of chocolate cake scraps left over after making a wedding cake recently so I froze it, thinking maybe I'd use it in a trifle later. The trifle never happened. But I have been wanting to try making cake pops for a while, so I had a pre-made cake AND cleared some space in my freezer! Yay!

Kyle got me a book for Christmas called 'Cake Pops' by Bakerella. She makes all kinds of super cute cake pops--animals, robots, mini ice cream cones, faces, etc. Unfortunately, I didn't have any sprinkes or candy on hand to decorate mine, so they were pretty plain. Still, pretty easy to make. Here are the basic steps...

First, the cake has to be thoroughly crumbled.


Next, stir in about 3/4 of a container of icing and stir until it's completely mixed in.


Shape cake into balls! I used a scoop so they were evenly sized. The recipe said it would make about 48, but I made them a little smaller and got about 65.


Put cake pops into the fridge for a few hours until they're firm.


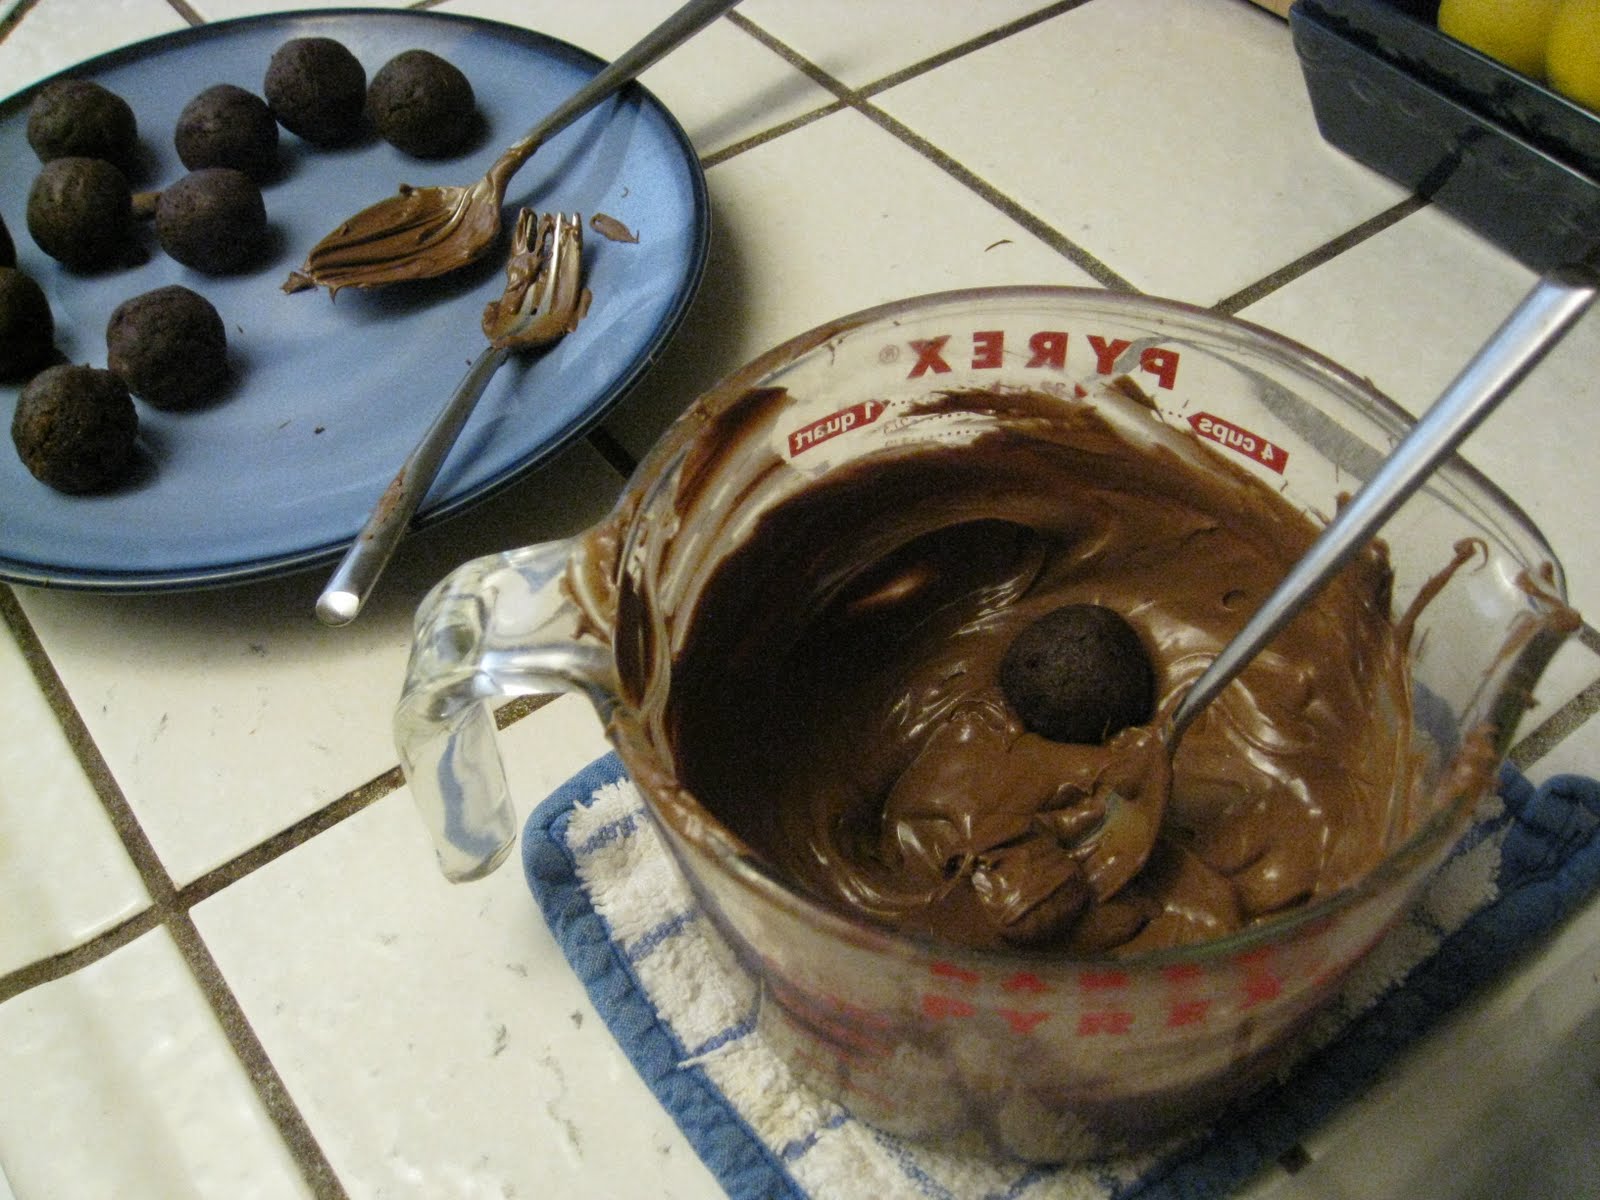
Here's the fun part--dipping them in chocolate! A stick could be added to them now, to make them into pops, or just dip them, like I did, and leave them as they are.


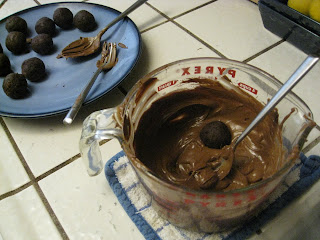
I put them on waxed paper to dry, which didn't take very long. This is where sprinkles/candies are added if they're being decorated.


Well, not nearly as pretty as the ones Bakerella made in her book! They're easy to make though...I'll try them again later for a birthday party or holiday and spend more time on how they look. The best part is that any combination of cake and icing flavors can be used! Unfortunately, Kyle and I don't eat cake so now I have to give away a lot of cake pops! Thankfully our neighbors like sweets! :)

Thursday, March 10, 2011

Parker

Parker is five months old today! Wow--time flies! It's amazing how much a baby can change in just five months. We've been trying to be consistent in taking a lot of pictures and even writing down things he does as he goes through all his different stages. It's so much fun!! :)


Parker has learned a couple new tricks lately. A few weeks ago, he realized he has feet! For the first day or two he noticed them, he would hold his legs up in the air and just stare at his feet, back and forth from one to the other. Then he finally started to grab at them, and now he constantly tries to put them in his mouth. Makes diaper changes a little more difficult...


He also learned how to roll over! He had been rolling onto his side a lot, but that's as far as he got. Last Saturday he was on his side again so we started playing with him, trying to get him to roll all the way over. After a few tries he finally made it! He then looked up at us with a huge grin--he was obviously very proud of himself! :) unfortunately, he doesn't really like being on his stomach. So once he rolls over, he quickly gets upset until we put him on his back again.


We're loving every minute with our little man! We can't wait to see what he does next! :)


Tuesday, March 8, 2011

Cake decorating

I've made a lot of cakes before, but I recently tried something new--a wedding cake!
A couple in our church were married in February and they asked if I'd make their cake. I was excited that they asked me to do it! I love trying new decorating ideas! And looking at the picture she showed me, I didn't think it would be too difficult. How hard could it be to cover three cakes and then drape them with fondant?? HAHAHAHA!!! Yeah, I can laugh now...because that ended up being one of the hardest cakes I've ever made!
Because it was mostly for a display cake, two of the tiers were foam. So covering them and one real cake with the base layer of fondant was pretty easy. The hard part was draping more fondant around them. I make my own marshmallow fondant which is soft and easy to work with. But when I tried to roll out long narrow strips, they'd stretch and sag as soon as I picked them up and it wouldn't go on the cake. So I would take it off and re-roll it and try it again. Kyle came out to see if he could help and he gave some good suggestions for how I might be able do it. We finally got one to work and I ended up doing the other pieces the same way. But it still took several tries to get each of them on the right way.

This was the cake once I was finished with it. The flowers were put on at the reception site so this was all we got to see of it until after the wedding when we were sent pictures.


Here is a picture of the cake at the reception. I love the flowers she used--they definitely improved it!


Shortly after the wedding someone asked if I had been nervous about a big project like that... I guess maybe I SHOULD have been. I was working off a print out of a picture she liked and if it didn't work out they wouldn't have had a cake. :) Fortunately it turned out okay! What can I say?! I like a challenge! Which is a good thing because, in two weeks, I will be making another wedding cake! :)

Here are a few other cakes I've made....


I told Kyle I'd love to have a home bakery/decorating business some day. Who knows if it will ever happen, but it's a fun thought! :) When people ask me how I got started, I always tell them it was my Mom! She decorated cakes for years and always did a beautiful job! I'm so thankful she had the patience to teach me how to do it. Later on I took a few cake decorating classes, too. It's a great way to be creative and make others happy at the same time! :)
Thanks, Mom, for sharing your talent!!

Friday, February 11, 2011

New pants!

With Parker growing so much, we've gone through several sizes of clothes already. We have all kinds of shirts and onesies for him, but it's hard to find pants that fit. It seems the only kind that fit him well are the knit or fleece ones with an elastic waist. All other kinds I've tried on him are too big in the waist, or too long, etc. But I can't find the kind I like very often--they're usually sold as part of an outfit, which can be expensive and he wears different sizes in shirts than in pants. So I decided to try making him some!
I bought a cheap pattern, but when I got it home and cut it out, it wasn't what I wanted...it was two pieces instead of four and it would be way too baggy for his short little legs. So I put it away and went online instead, looking for something better. I found a tutorial here: http://www.dana-made-it.com/2008/07/tutorial-knee-pad-pants.html, from someone who made up her own pattern and they turned out super cute! I used her idea, and here's how I made them...

First I found a pair of Parker's pants that fit him the best (excuse the stains!).


Next I turned them inside out and folded them so they were flat and the back seams were showing.


After they were folded, I put them on a large sheet of paper and traced around them, leaving about 1/2" on all sides for a seam allowance. I left extra allowance at the top and bottom for the elastic and hem.


Once I cut traced the back, then I folded them the other way and traced around the front seams the same way. I cut out both pieces, then used them as patterns to cut the fabric--two fabric pieces from each pattern.


The last part was sewing them together! Unfortunately, I forgot to take pictures of the sewing process. But if anyone is reading this and is wanting to know how, you could watch the tutorial above. :) Although I wouldn't have thought to make a pair of pants by tracing around another pair, they did turn out pretty well! Here's the finished pair next to the brown ones I used as a pattern...


Since they turned out and fit him so well, I think I'm going to make a couple more pairs. The black fleece only cost around $3 and I still have some left over for another project and the pattern, of course, was free! So not bad for a pair of pants! Here's a picture of Parker wearing them...