No, not real ones! I would probably have a heart attack if I started seeing big fuzzy caterpillars in my home. Nope, these are cute homemade ones.
Elise was reading The Very Hungry Caterpillar recently and I had the bright idea to make caterpillars with the kids. All it took was a handful of large pompoms and a few googly eyes.
Parker and Elise chose some pompoms and handed them to me in the order they wanted. I hot-glued them together and added a couple eyes and they were ready to play with! :)
Super quick and easy and they're still being played with two weeks later. Here are the caterpillars we made (Yes, I made one, too!).
Showing posts with label toys. Show all posts
Thursday, July 31, 2014
Monday, February 24, 2014
Stick Puzzles
I'm always on the lookout for simple art projects I can do with Parker. Given his love for puzzles, I knew this would be a hit! I even had all the supplies for it! Granted, we only needed popsicle sticks and pencil crayons, but still... :)
First we taped 8 sticks side by side so they would stay together. Then we turned them over and drew pictures on the front. As you can see I'm pretty limited artistically, but Parker thought they were great. His drawings were a bit more abstract--I guess he wanted more of a challenge when putting them together later! ;)
Tuesday, November 26, 2013
Parker's Dog Kennel
As I may have mentioned, Parker has a thing for dogs (puppies, as he calls them). At last count he has eight small stuffed dogs that he carries--or leaves--all over the house. I was wondering how to keep them all in one place, partly so they are picked up, but also so he knows where they are if he wants them. He needed a dog kennel! :)
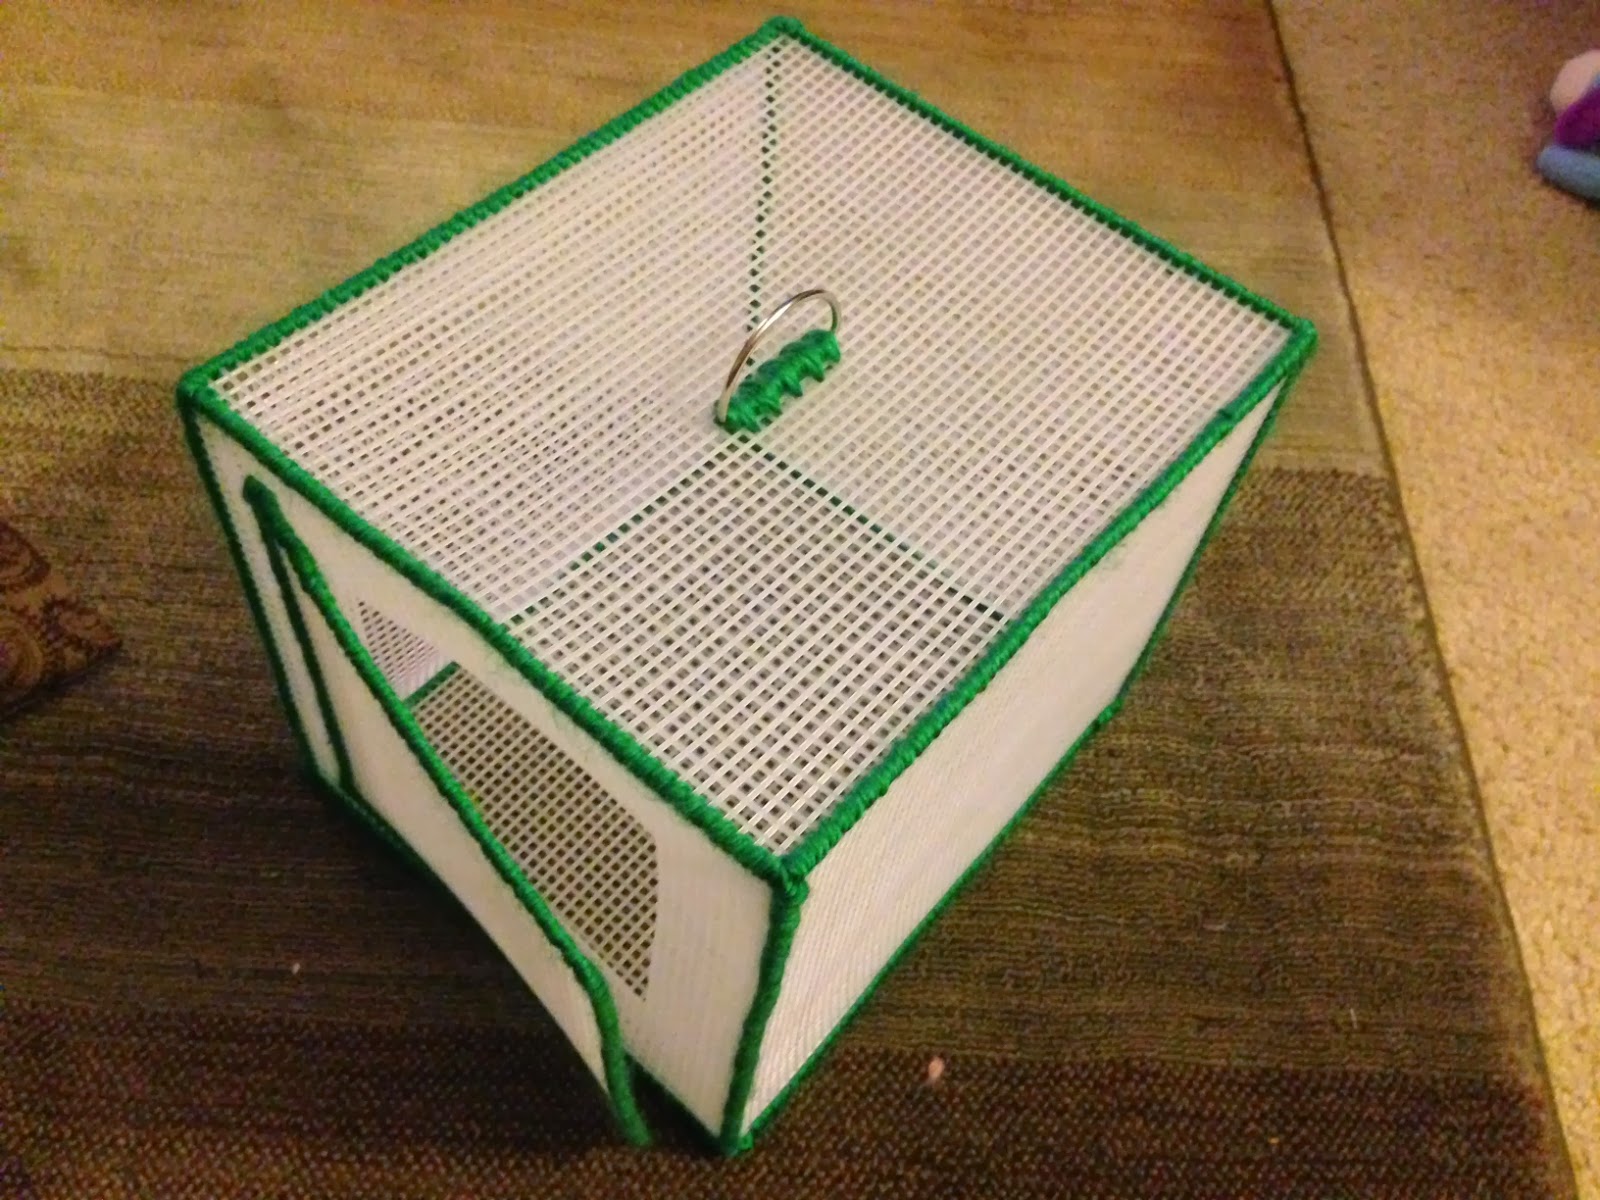
I was wanting to make something anyway, so I figured this might be fun. And when I mentioned it to Parker he thought it was a great idea. So off we went to Joann's! I already had decided I would make it similar to Daisy's (our real dog) kennel. Which meant it would have mesh sides so Parker could see the dogs inside, it would need a big door on the front, and a handle so he could carry it around.
I bought a few large sheets of plastic canvas for the sides. I knew Parker would want green yarn on the edges so I basically just gave him a choice between various shades of green. And of course, he picked the brightest one. Nice! :) The only thing I wasn't able to find was a handle. Joann's used to sell handles for making purses but they no longer had them in stock. So the next best thing was a large 'D' ring--it would be plenty big for Parker's little hands. I grabbed a couple yarn needles and we were on our way home. Even though he knew I was making it, I didn't want him to see it until it was done so I waited until the kids were napping before starting it.
I didn't have a specific size in mind, so I just cut the canvas sheets in half for the sides. But I thought that might be too big for a little guy to carry around, so I cut it down a couple times until it seemed like a good size--big enough for his dogs, but small enough for him to carry. I cut out the two end pieces and a door and started stitching them together at the edges with the bright green yarn. I wasn't quite finished by dinner so I put it away and finished it after they were in bed for the night. Here it is after stitching it together.
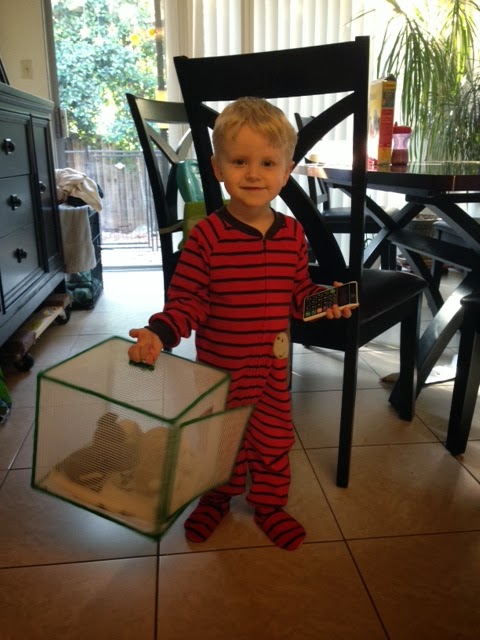
Parker carried it around all that day! He brought it from room to room and sometimes would go set it down next to Daisy's kennel for a while (pardon the mess--Daisy just had a bath!).
I still need to figure out some kind of 'lock' for the door so it will stay closed. But, as Kyle pointed out, stuffed dogs aren't going anywhere. So I guess there's no hurry. :)
Wednesday, October 30, 2013
Elise's Book
I mentioned earlier that I was making Elise a quiet book for her birthday. And I'm happy to say that I finally finished it! Ok, I guess I should say I'm almost finished it. The only thing left is putting in the eyelets so the pages can be put on rings. But I'm having Kyle help with that and he's not free until the weekend. So I'm done everything else. And I'm SO happy it's finished. I really wanted to make her one but it's a big project. Hers took longer than Parker's partly because I now have two little people needing attention rather than one, and also because I didn't have patterns for most of the pages. I had to draw them myself. I like how it turned out, though!
Rather than the bright yellow bumble bee cotton I had picked out for the inside of the cover, I changed my mind and used a light pink butterfly print instead. But it had yellow butterflies on it so I kept the pale yellow fabric for the pages. Pink would have been better but the thought of going back to Joann's and buying several more yards of fabric, washing/drying it, pressing it, cutting out eight more pages and ironing them all onto interfacing made me tired. Hence the reason I went with yellow pages. :)
Before I show pictures, I should ask you to disregard the sloppy writing. It's the only part of the book I'm disappointed with. When making Parker's book I wrote out the words in a water-soluble marker to make sure the size and spacing were right, then traced over it (or beside it) with a permanent marker. Sadly, the water-soluble blue ink did not wipe off completely so most of the pages in his book have faint blue letters under the words. I didn't want to make the same mistake with hers, so I used only the permanent marker and made it as straight as possible. Not great. :(
Anyway, here are the pictures of her book:
The last page is a mini flannel board with felt shapes. For some reason I couldn't come up with anything else to put on that page. The flannel board might work out well, though... if Elise gets tired of making pictures of ice cream cones or hearts, it will only take a few minutes to cut out and fill the pocket with completely different shapes.
So that's the big project I've been working on! I wish I could have done a better job writing in it but I'm not about to start over because of a few crooked words. Thankfully I doubt think Elise is going to notice. She'll have fun playing with it.
And that's all that matters. :)
Friday, September 13, 2013
Birthday Planning!
With the kids' birthdays coming up, I have lots to keep me busy the next few weeks! This is the first year Parker understands what a birthday is (somewhat, anyway) so I wanted to let him help out. I showed him some cakes of various things--animals, cars, trains, etc. and asked him what kind of cake he wanted. At first he said yes to all of them, so it took a few minutes to help him understand that he only gets to choose one. But once he got that it didn't take him long to pick one out. Keeping with the cake theme, he and I picked up a few things for goody bags, and we baked a batch of cookies yesterday and put them in the freezer. I tried to get an early start this year so I'm not running a bunch of errands the day before the party. All that's left for his party is to get the food for lunch that day, a few balloons/decorations, and make the cake. I'll leave all the fun little details for later when I can post pictures of the party! :)
I have an idea of what I want to make for Elise's cake, too. I've been pinning a bunch of pictures, so now I just have to sit down and pull things from different sites to make it just right. Hard to believe our baby girl will be one in just a couple months--where did this year go?!
At first I thought I'd use the same pattern as Parker's but that's boring, right? I might use one or two of the same pages. But I went on Etsy and Pinterest and looked at a lot of quiet book pages and patterns and I think I found enough different page ideas that can fill the book. The downside is that because the pages I found were from so many random sites, I'll have to make up patterns as I go along. It may take a bit longer since I'll have to draw them out first, but Elise will end up with a one-of-a-kind book! I went ahead and cut out the cover and the pages so I'm ready to start putting the pictures on them. Will post pics later of the finished book!
I have an idea of what I want to make for Elise's cake, too. I've been pinning a bunch of pictures, so now I just have to sit down and pull things from different sites to make it just right. Hard to believe our baby girl will be one in just a couple months--where did this year go?!
I had wanted to make her a quiet book for her first Christmas, as I did for Parker, but with a newborn AND a toddler this time around, that didn't happen. After she was born I still considered trying to make it for Christmas. And then I laughed that I would even consider such a thing. :)
So....it will have to be for her 1st birthday instead. And you know what? She will never know the difference! My goal was to work on it over the summer and have it finished by now. Ha! Haha! Yeah.... I finally found and ironed the fabric for it last week.
At first I thought I'd use the same pattern as Parker's but that's boring, right? I might use one or two of the same pages. But I went on Etsy and Pinterest and looked at a lot of quiet book pages and patterns and I think I found enough different page ideas that can fill the book. The downside is that because the pages I found were from so many random sites, I'll have to make up patterns as I go along. It may take a bit longer since I'll have to draw them out first, but Elise will end up with a one-of-a-kind book! I went ahead and cut out the cover and the pages so I'm ready to start putting the pictures on them. Will post pics later of the finished book!Friday, September 14, 2012
Fun with Foam
I was looking for some new ideas for toddler activities and I came across one that I was sure Parker would enjoy--pushing golf tees into a styrofoam block! :) I found the idea on Pinterest (of course!) and thought I'd try it, since it only took two supplies. I was at Michael's last week and picked up a small block of styrofoam, about the size of a brick. I was pretty sure we had some tees at home with our golf bags.When I went out to get the tees later they seemed a little sharp and I started re-thinking the idea...I didn't want Parker to hurt himself trying to push them in. But as I set them back down I noticed a small bag of golf ball markers. They're also made to stick into the ground, but the tips are plastic and rounded so there'd be no danger of him poking his little fingers.
I set the block on the table with the bright colored markers and Parker immediately became curious. I set him in his chair and showed him how to push the markers into the foam. His eyes lit up and he couldn't wait to try. He loved it!!
The markers were small so I stayed with him while he was playing just to make sure he didn't put them (or his little foam-covered fingers) in his mouth. He put the markers in and then pulled them out over and over. And over. He didn't want to stop! He played with it for almost 45 minutes straight before he put it down, and even then it was more because I was wanting to stop.
The only problem with foam is that it makes a mess. Even with the plastic wrap on the foam, it still left 'crumbs' everywhere so when he was finally done playing I threw it away. I think next time I'll let him push the markers into a lump of playdough and see how that works instead.
I love finding new things for him to try! It's fun to sit and watch him concentrating so hard on something. :)
Sunday, June 24, 2012
Doll Diaper Bag
Parker's little friend turned two this week and we were invited out to a small local park/zoo to celebrate with her. It was a fun day! We saw a few animals, fed and pet some goats and then went on a couple rides. Parker was a bit scared on the carousel, but he LOVED the second ride--a ring of tiny fire engines and police cars that went slowly around in a circle. I buckled him into one of the fire engines and stepped back, expecting him to freak out once the ride started. But when it started to move he looked up with a grin and began turning the steering wheel and ringing the bell! It was the cutest thing ever to see him riding in that little car all by himself! :) He would look up at us and smile every time he went around. There weren't many people there so when the ride ended we got in line again and he got right back on. And then we did it again and again....and again! He was having a blast. Poor little guy...I felt bad when we finally decided to leave. I'm sure he could have happily stayed there all day! I think all the excitement wore him out, though. On our way home Parker was in the car for only five minutes before he crashed. Kyle carried him straight in to his bed and he didn't even wake up. That never happens!We were happy we could help celebrate Kaylee's big day! I wanted to make her something for her birthday, but the week before was so busy that I never got a chance to work on it. My idea was to make her a doll diaper bag, something I had seen on Pinterest and thought it was just too cute! The picture was from a blog though, and that's all it was--just a picture. She didn't have a pattern or tutorial for it. I know because I emailed the author to ask. :) She was very nice and wrote back saying she had found a pattern for a regular bag and tweaked it to make it the size she wanted. Made sense. She gave me a few measurements to try. I'm not sure if this is actually the "pattern" she used or if she was just trying to be helpful. Here were the measurements she suggested:
back: 10x7
front: 10x7
flap: 10x7
sides: 4x7
bottom: 4x10
handle: 4x?? (depends how big your child is!)
Not having anything else to go on, I pulled out an old piece of cotton and cut out the pieces listed. I cut out a second set of pieces for the inside lining. Wouldn't hurt to sew a practice one and see how it turned out. I didn't take pictures of that first one I made, but it turned out pretty well. There was something about the size I wasn't completely happy with so, like the blogger, I made some slight adjustments. I didn't make another practice one, but when I cut out Kaylee's bag I changed the dimensions a little. I also added an elastic pocket on each outside end and a couple more pockets inside. I figured her doll would need a lot of accessories. :)
I wanted the bag to have some stiffness so it would stand up on it's own so I lined the whole thing with fleece. Aside from cutting out the pieces, sewing the bag only took a couple of hours--I was able to sew it all during Parker's nap. Here's how it turned out:
I had a little extra time, so I cut out a matching changing pad and a few wipes. The wipes are squares of muslin. I used pinking shears to cut them out and left the edges raw. The changing pad is reversible, with one side matching the bag and the other side a coordinating solid. And I sewed a ribbon in one end to wrap around and tie it.
Considering I didn't have a pattern to go on, I was pretty happy with how it turned out! If our next baby is a girl, I know what one of her future Christmas gifts will be! :)
Friday, May 4, 2012
Toddler Toys--Wipes Case
Has your little one ever gotten hold of the wipes? Then you know what a mistake it was for me to ask Parker to hold the wipes package for a minute... :)
A few months ago we were in a store and I handed it to him to keep him busy. I was hoping he would just enjoy the crinkling of the package. Um, no. When I checked on him a minute later, he was surrounded by wet, sweet-smelling wipes and was happily pulling out even more!
With all the toddler toy ideas I've found, I came across one where you pull scarves or fabric squares out of a wipes case. Great idea!! I usually buy wipes in a plastic package because the cases are big and bulky. But I had gotten a free sample of cottonelle wipes and they came in a nice little compact-size pop-up container. It's the perfect size for Parker to hold and the hole in the top is a flexible rubber strip so it's also easy to get his little hands inside.

I wasn't sure what to use for fabric... I tried cotton, but it bunched up and the thickness made it hard to pull through. Then I remembered I had some thin, sheer fabric that was left over from our wedding so I got that out. It was soft and really easy to pull through the hole.
Since the squares were just going to be pulled out of a box, I wasn't worried about making them look pretty. I cut out five square-ish shapes and crammed them into the little container. I showed Parker how to pull on the first piece and he quickly yanked it out and reached in for the other ones. How fun! :)
But I wasn't actually finished. Turns out that the fabric I used frays terribly so after Parker pulled the pieces out a couple times he and the floor were covered in little silver threads. So I needed to hem the edges. Again, I didn't measure anything. I just folded them under twice and sewed a wide, quick hem on all the raw edges.
It only took a few minutes but, as you can see, Parker was a little anxious to have them back to play with!
A few months ago we were in a store and I handed it to him to keep him busy. I was hoping he would just enjoy the crinkling of the package. Um, no. When I checked on him a minute later, he was surrounded by wet, sweet-smelling wipes and was happily pulling out even more!
With all the toddler toy ideas I've found, I came across one where you pull scarves or fabric squares out of a wipes case. Great idea!! I usually buy wipes in a plastic package because the cases are big and bulky. But I had gotten a free sample of cottonelle wipes and they came in a nice little compact-size pop-up container. It's the perfect size for Parker to hold and the hole in the top is a flexible rubber strip so it's also easy to get his little hands inside.

I wasn't sure what to use for fabric... I tried cotton, but it bunched up and the thickness made it hard to pull through. Then I remembered I had some thin, sheer fabric that was left over from our wedding so I got that out. It was soft and really easy to pull through the hole.
Since the squares were just going to be pulled out of a box, I wasn't worried about making them look pretty. I cut out five square-ish shapes and crammed them into the little container. I showed Parker how to pull on the first piece and he quickly yanked it out and reached in for the other ones. How fun! :)
But I wasn't actually finished. Turns out that the fabric I used frays terribly so after Parker pulled the pieces out a couple times he and the floor were covered in little silver threads. So I needed to hem the edges. Again, I didn't measure anything. I just folded them under twice and sewed a wide, quick hem on all the raw edges.It only took a few minutes but, as you can see, Parker was a little anxious to have them back to play with!
Saturday, April 28, 2012
Toddler Toy--Doorstops
This toy wasn't my idea. It was made by my husband, Kyle! A few months ago he had planned to make Parker a little wooden box with different activities on each side. Last Fall was a little busy for us, though, so it was never made. But he saw the supplies today when he went out to clean the garage, so he decided to work on it. When he tried to put it together, however, he realized the wood he had picked out wouldn't work, so he decided to just use one of the boards and keep it simple. He screwed four doorstops on the front of the board. Done!
Confused? :)
Think of those little doorstops that look like springs. They bounce and make a loud, annoying "BOING" sound when you kick them. Yes, those doorstops. :) It seems like kids are drawn to those like magnets. So what better toy could you make than a small board with four springy doorstops that Parker can bend and pull on to his hearts content?
It was an instant hit! Parker sat and played with it for quite some time. Not my favorite sound ever, but he loves it. And it's pretty hard to resist Parker's cute little grin when he finds a new favorite toy... :)
Tuesday, April 10, 2012
Toddler Toys--Lacing Beads (or Rings)
I made this toy a few weeks ago but never got around to posting it. I saw some sets of lacing beads online and they had good reviews from parents of both boys and girls, so I was thinking about buying a set. It's basically a length of thin rope and jumbo wooden beads to string, to help teach toddlers motor skills. But ordering them and paying shipping was a little pricey, so I saw some ideas for making a set instead.
I checked Joann's for large beads but even though they were big, they were still small enough that Parker could put them in his mouth so I opted not to get them. I was going to put it on hold for a while, however, I was in Target shortly after that and I happened to walk past a box of foam pool noodles--perfect! We picked out a bright blue one and paid $2 for it. Kyle already had some thin red rope left over from another project so I was all set. The only 'tools' I needed were a serrated knife and a cutting board.
I started cutting the noodle into rings, making them different widths. It cut really easily with a knife! I only used about half of the noodle and I got a pretty good pile of rings.
I cut a piece of rope about 3' long and tied a loopy knot in one end so the rings wouldn't fall off as easily. The last step was to light a match and hold the ends of the rope up to the flame just for a second. This melted the fibers together so the ends can't fray and come apart.
That's it!
Although I don't think Parker is old enough for this one just yet... he didn't quite get it when I showed him what to do--he tossed the rope aside and wanted to stack the little rings! Since then he's enjoyed playing with them and scattering them throughout the house. I tried showing him again last week how to string them and he actually did okay, as long as I held the rope for him. So I guess this may be one for when he's a little older. :)
Thursday, March 8, 2012
Toddler Toys - Velcro
The first toddler toy I made Parker was a hit, so I thought I'd try another one! Most of these ideas are from Pinterest but I mainly just look at the pictures and then make up my own version. The toy for today is velcro sticks! Because what kid doesn't love to tear velcro apart?! Velcro is still fun for for me and I'm, well...let's just say I'm a lot older than Parker! :)
I found a package of jumbo craft sticks (like popsicle sticks, but bigger) at Target for $2. I had to go to Joann's for the velcro. I bought the kind that has a sticky back so they're easy to put on, but the downside is that they're a little pricey--$3.80 for 30 round dots. And you need four per craft stick, so I only had enough for 7. I was thinking later that it would probably have been cheaper and worked just as well to buy a strip of velcro, cut it into squares and glue them on the sticks.
BUT I already had the dots. So the only work involved for me was peeling off the velcro dots and placing them on the ends of the sticks (on both sides!). Can't get any easier than that! :) Since I only used a few of the craft sticks, I may pick up more velcro later and make a few more. But for now these would be enough to see if Parker liked them.
I waited until after dinner before getting them out. I needed a few minutes to put food away and wash dishes, so I pulled these out and set them on his tray. I showed him that the ends stuck to each other and he grabbed a couple and began putting them together. Well, I finished cleaning and doing dishes and he was still so intent on his building that I sat down and was able to sew for about 20 minutes before he started squirming to get down. Love that it kept his attention so long! I don't know if it shows in the picture, but he was focusing so intently that his tongue was out most of the time. :)
Subscribe to:
Posts (Atom)