Wednesday, June 26, 2013

Butterfly Dress

Now that our weather is nice and warm hot I love wearing dresses. The only problem is the dresses I have aren't exactly nursing friendly. Meaning if I'm wearing one of my maxi dresses, I have to either take it off to feed Elise or have the whole thing bunched up under my neck. Not convenient. Or comfortable.

I found a dress at ROSS last summer that's perfect. It's knee length with short sleeves. The bodice and sleeves are shirred and super stretchy. So when it's time to feed Elise I can just pull down the whole top of the dress. Love it! I keep looking for other ones that can pull down or have straps that would slide off easily but no luck so far. My last resort was to make one.

I happened to see this pattern at Joann's a couple weeks ago and it looked like a style that would work. The dress I made is the one pictured on the bottom left but with a short skirt. It has elastic around the neck, sleeves and waist.

I wasn't sure what fabric to use though. I like the way knit drapes for a dress, more so than cotton, so I looked online for a jersey knit. I wish now that I would have gotten a solid color but at the time I wanted a print of some kind. Nothing really stood out as awesome. I kept going back to this one though because I liked the butterflies. Not a huge fan of the blue and pink flowers, but I liked the brown and natural colors in it so I placed my order.

The dress turned out great! Easy to sew and it fit perfectly.


That's the short version. You'd think that after all my little sewing disasters the past couple years I would learn to follow a pattern. That's it--just make it like the pattern says. But no.
**sigh**

Without going into all the boring details, I will share a few things I learned while making this dress:

1) Using the size/measurements on the pattern actually does work! (I used the right measurements with this dress. However, I made a dress when I was in college and I went with my regular store size, a 5, and I could barely get the dress on it was so tight!) I found out making this one that my pattern size is slightly bigger than a 5.  :)

2) Don't try to line a knit dress, even if the fabric is thin.

3) Don't try to line a knit dress with another layer of knit, even if the person at Joann's [rudely] tells you it's probably okay.    :)

4) Don't add extra length at the bottom unless you want to end up cutting it off later or have a dress that's an awkward length. 

So after picking out a couple seams and re-doing part of it, I like how it turned out! Maybe I'll look for some better fabric and try another one later. I have a feeling the second one will go much faster than the first.  ;)


Saturday, June 22, 2013

Toddler Apron

We went to a birthday party today for one of Parker's friends. It was outside at a park and it was a beautiful day in San Francisco. Although we were right next to a playground, Parker was more excited to chase the pigeons and just run--the entire length of the park. I need to get that boy outside more often! He finally did try out the play area, and spent quite a while digging in the sand with Uncle Bryan. In fact, Parker was having so much fun digging that he turned down his cupcake! He must have had a very important project going on.   :)

Anyway, it was the perfect day for K's party and I'm glad we could make it out. She is the most adorable little girl!

K's parents got her a toy kitchen for Christmas. The next time we saw her she told me all about the things she 'baked' in her kitchen--cakes, cupcakes, etc. She sounded like quite the baker! I suddenly had an idea for a birthday gift... an apron! A girl needs to stay clean (and look cute) while cooking, right?

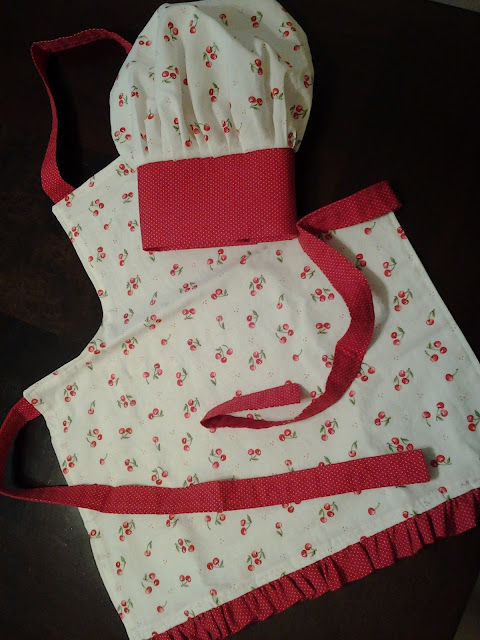
I looked online for an apron pattern for a toddler but didn't find anything in her size--she's tiny! Everything I saw was for either an adult or an older child. Finally I came across this pattern. Still too big, but I liked the simple style so I printed it out. And I still had plenty of the cherry fabric left over from Elise's huge future summer dress, so I pulled that out. I bought some red and white polka dot fabric to put with it (or POKER dots, as Parker calls them).

Parker is close to K in height so I measured from his chest down to his knees to get an idea of how long to make the apron. Then I tweaked the pattern a bit until it looked small enough. I wanted to add a pocket or her name somehow but couldn't decide on what to do so I left it off. Maybe her mom can embellish it later if it's too plain.  :)  Cutting it out/sizing it took a little while but once that was done it didn't take long to sew. I made the matching chef hat to go with it. Here it is!


I heard recently that K is getting tired of her play kitchen already, but that she likes to help her mom in the big kitchen. Yay--maybe she can use this when making real food. To make it more fun I also got her her very own cookbook--easy recipes meant for preschoolers.


It's a pretty cute set. I think Elise may get one for Christmas next year!

Friday, June 21, 2013

Suncatchers


This was something I had picked up at Joann's a few months ago. They had a bin of clearance crafts for $1 and I found these when I dug through.

 They're tiny and looked easy enough for Parker to make so I picked up three--one each for Parker, me and Kyle. We never got around to making them at the time and they ended up stashed away in his arts/crafts bin.


I wanted to make something with him this week and I remembered we had these little suncatcher kits. Perfect to hang on our big sliding door!

I brought them out yesterday and told Parker we could paint them after Elise went to bed. Once she was tucked in, I sat Parker at the table and opened a couple of the kits. He and I started painting our stars and Kyle joined us a little later.


Parker did a great job painting his little star. He started out with yellow and orange paint, but after a few minutes of dipping his brush into both containers he only had orange. Kyle and I were finished in about 5 minutes, maybe less. Parker took a little longer. And by 'a little longer' I mean he took almost an hour. To paint a tiny 2-inch tall star. It often amazes me how a toddler can drag something out sooooo long. I finally had to set a timer so he would be done by bedtime!


I think his meticulous painting paid off -- so cute!


I left them overnight to dry and they were ready to hang the next morning. Not sure how to hang string on a window but masking tape seemed to work. For now, anyway.


Aren't they pretty?  :)

Sunday, June 16, 2013

Gifts for Daddy

It's Father's Day! I'm looking forward to calling my Dad on skype later to say hi and let him see the kids! Would love for them to come visit again but I know it's a long way for them to travel. Thankfully they got a webcam recently so now we can use Skype and Parker doesn't forget who they are between visits. And Parker enjoys being able to show them his little art projects and toys. Some of our calls have been pretty entertaining.  :)

And I'm so thankful for Kyle and for what a wonderful father he's been to our own kids! He shows his love for us every day in so many ways--we're so blessed! I wanted to get something special for him so I had some pictures taken of the kids and used one of them to make a big canvas he could hang. Isn't this the cutest picture ever??  It totally shows their personalities.  :)


We also got him a leather catchall tray. When Kyle comes home he sets down his wallet and keys in random places and then the next morning he walks through the house asking where his wallet and keys are.  :)  So assuming he keeps the tray in the same place, he shouldn't lose his wallet and keys anymore.  


And finally, we gave him Parker's gift. I thought it would be cute for Parker to make his Dad something this year. I kept seeing recipes for clay that you use for impressions and bake and thought I'd try that with Parker. Every father needs a big clay paperweight, right?  :)
The one I made only used three ingredients so it was really quick. I divided the dough in half and helped Parker press his hand into one of the circles. I tried to make one with Elise, but she wouldn't open her little hand. She just kept pulling her fingers into a fist. 
We put Parker's print in the oven and let it bake for a few hours to harden and dry. It worked really well!

It looked fine as it was, but Parker loves to paint so why not have some fun with it...? 
I let him pick out the colors and handed him a paint brush. Here is what my little artist did (Mommy only helped with the green hand outline).
We set it outside until the paint dried and then put it away to keep for Father's Day. I told him it was our 'secret' and he couldn't tell Daddy yet and he giggled like keeping a secret was the best thing in the world. 

I pulled it out this morning and handed it to him, telling him to go give it to Daddy. He proudly handed it to Kyle, saying that HE painted it. I tried to get a picture of Parker holding it but he was so excited he would barely sit still.


Not exactly sure what Kyle will do with it...maybe we'll put it away for Parker to look at when he's older. Homemade gifts from your kids are the best.  :)

Wednesday, June 12, 2013

Romper Dress

Since the cherry dress I made for Elise probably won't fit her until next summer, I pulled out another piece of fabric and a different pattern and tried again. This pattern was a different brand and I hoped the sizing would be more accurate. I thought I would be making a sleeveless dress with matching panties. However, when I cut out the pattern I saw that it was actually a dress with an attached romper bottom. Huh. Guess I should look at details more carefully before I buy! But I already had the pattern and it looked cute in the picture so I went ahead and got the rest of the supplies needed to make it.

Once again I made the size that showed the correct size/weight for Elise. Aaaaannd, once again it turned out too big.  *sigh*

I tried it on her today and the length was actually okay--leaves a little room to grow, which I'm okay with. But the armhole openings are ridiculously huge. Look at this!


???


Elise is a tad chunky, yes, but what baby has arms big enough for this dress??!

I didn't want to start over, so I played with it for a while and ended up just sewing from the armhole down to the side seam and then cutting off the extra. It means the side seams of the skirt and romper are attached partway down, which I don't love, but at least it's wearable.


I stitched a few white ribbon flowers on the front to finish it. Here it is on Elise.


Aside from the minor alterations I'd say it turned out okay. Not great, but okay. My experience putting in zippers is limited. Part way in I realized I had the foot lined up in the wrong place. Being the slightly impatient person that I am, I didn't bother picking it out. I just sewed the other side the same way. Slightly crooked seams are okay, right?  :)  The other hard part was sewing on the snap tape. I've never used it before and thought it would be super easy to sew on. I was a little bit wrong... the edges are narrow and  it's sewn on the very edge of the fabric so it was hard to get a straight seam. I ended up ripping out the seam and hand sewing it on instead. The stitches are more noticeable but hopefully more neat looking.

I want to make more clothes for her but I don't trust the size measurements now. The cherry dress was simple enough I may try it again in a smaller size. I have enough fabric here I'm sure I can find something that would be cute.  Although Elise would probably look cute in pretty much anything.  :)