Saturday, May 26, 2012

Grad Gifts

What do you get a high school senior for a graduation gift?

There are five high school grads at our church and we wanted to get them each a small gift but had no idea what--especially since we don't know them very well. I'm so not a fan of the usual engraved picture frames or pen sets... And a friend was already getting them a book or a gift card so I didn't want to get the same thing.

What about homemade gift? My first thought was to make them each a cookie bouquet--bright, cheerful and edible! But I started looking for supplies and it was going to cost more and probably take longer than I'd like, so that was out. Kyle had suggested cake pops and I decided that may be the better option. I had made them for Bible study one night and everyone seemed to LOVE them! Kyle gave me a book for Christmas called "101 Gourmet Cake Bites" so I got that out to look up flavor ideas. It was decided that I would make chocolate toffee, white chocolate macadamia and strawberry shortcake. Sounded like a good variety!   :)

I made these cake pops (cake balls, technically) almost the same way as last time:
-crumble a baked cake into a bowl
-add frosting and mix well
-shape into balls and chill
-dip cake balls into chocolate
-chill until set

The only difference with this batch is that I used homemade buttercream frosting and a few add-ins. And I wanted to make them early in the week, so I mixed up the cake and icing, shaped them into balls and left them in the freezer for a few days. I finally got them out this afternoon to dip them in chocolate and get them ready to take tomorrow.


Four of the boxes have a 'graduation cap' cake ball in the center.  The hat part was made with a cordial candy mold, then I stuck a square of Ghiradelli chocolate upside-down on top. The tassel is a tiny strip of sour candy and it's topped with an M&M cap!   :) I found the idea on Bakerella's website.


I found these fun little boxes at Michaels and thought they'd be a great way to display the sweets. I set each cake ball in a black and white damask cupcake liner and then tied the boxes with black ribbon. Finished! Not a typical grad gift, but hopefully the students like them.  :)

Thursday, May 17, 2012

Frozen Meal Swap

I've been looking up recipes lately, thinking it would be wonderful to put together some pre-made meals and stock my freezer. But it's more fun doing it with someone else. So, on a whim I sent out an evite to ask some friends if they'd like to participate in a frozen meal swap. I was excited to hear back that almost everyone wanted to do it! We had a total of eight people participating! I've never done a meal swap with that many people but thought it would provide a nice variety of food...and a great way to spend time with friends! :)  If you've never done a meal swap, it's pretty simple. Here are the basics:


--Choose one recipe that freezes well and make multiple batches (the number will depend on how many people come to the swap) Think casseroles, sauces with pasta or rice, stews/soups, meat with a side, etc...


--Place a complete meal (enough to serve 4 people) in a foil pan or ziploc bag. Cover tightly and label each bag with the contents and cooking directions. You're going to make as many pans/bags of food as there are people at the swap.


-- If your recipe is a sauce, you may prefer to include a bag of dried rice or pasta that can be stored and cooked later.


--Come to the swap and give each person (including yourself!) a meal that you made. You, in turn, get a meal from every other person as well. So you leave with several different meals that you can put in your freezer. Great for busy days and you also get to try some favorite recipes of other ladies in the group! 


Of course, you can customize it for whatever group you have....if you invite couples rather than families you could make smaller servings, or you could assign certain people to just bring freezer desserts, etc. If you decide to host a meal swap with only one or two others, you may want to EACH make a few different recipes, so you still end up with a good variety and number of meals to freeze. 


We didn't have many 'rules' for our swap. Everyone just made and brought whatever they wanted to...which actually made it fun because we had no idea what we were going to end up with!  :) 


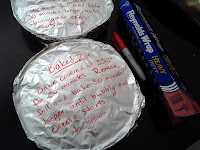
I decided to make baked ziti as my contribution. One batch/recipe makes enough for two smaller pans, it freezes really well and it happens to be one of my favorite things right now.  So on Monday and Tuesday of this week, whenever I had a free hour I would make a couple pans of ziti and freeze it until I had made eight pans of food. I prefer to use disposable aluminum pans for freezer meals. That way there's no clean up after it's cooked. Once the pan is filled, I wrap and cover it well with foil and write the contents and cooking directions on the top with a sharpie. 


After the swap this is what we now have in our freezer: lasagne, baked ziti, spaghetti with sauce and meatballs, homemade ravioli, chili, a noodle/sausage casserole, crockpot chicken & veggies, and quiche! Yum--can't wait to try all the new dinners!


Thanks to everyone who participated!!  :)


Wednesday, May 9, 2012

More Sewing Classes

My last couple sewing classes have been fun! The next one is tomorrow, so I'll have to post pictures later of the placemats we're making.  :)
The March class was quilting with circles. I love making quilts, so I was excited to learn a new way of doing it. And the best thing about this technique is that you do the actual quilting as you put the blocks together so you don't have to go back later to finish anything. The suggested project was a table runner but I didn't see any fabric that screamed "put me on the table!" so I opted for flannel, thinking that if I liked it, I could use it for a baby quilt. I picked out a white print with animals and trees and a coordinating piece with green and brown dots.
As usual, I went ahead and washed/dried the flannel and ironed it to make sure any shrinkage was taken out before I sewed it. Although I'd love to write out a tutorial for making it, I'm not sure I could get all the directions across clearly, especially since I don't have pictures of the process. But I'm sure if you look up circle quilting online, you'll find plenty of helpful sites!   :) This is what I did in class...


I really liked how it was turning out, so I got a little more  fabric and cut out more blocks to make it a full sized baby quilt. I worked at it over a few days and this is the finished product...


I like that you end up with a pretty, scalloped edge around it! Or if you prefer a traditional straight edge, you can just fold in the scallops and sew across them so all the blocks look square. Although it took a little time, it was a fun project! I was going to use it for a baby gift, but I may end up keeping it. It might come in handy in a few months....  :)


The class I took in April was on applique. I've done applique before, but decided to take the class for fun anyway. They did it a little differently than what I'm used to. I normally iron my pieces onto interfacing, then stitch them on one at a time. In the class, we used a type of fusible web and put all the little pieces on at the same time. You build the picture first, using all the pieces, then you sew around them, changing thread color as you go. Not sure which method I prefer...
Anyway, I decided to make something for Parker, so I stitched a little taxi onto a piece of muslin. My plan is to cut it out and make a little pillow for him. I need to get a small pillow form to finish it, but here's the applique, though. 


Looking forward to my next class tomorrow night! 

Friday, May 4, 2012

Toddler Toys--Wipes Case

Has your little one ever gotten hold of the wipes?  Then you know what a mistake it was for me to ask Parker to hold the wipes package for a minute...  :)

A few months ago we were in a store and I handed it to him to keep him busy. I was hoping he would just enjoy the crinkling of the package. Um, no. When I checked on him a minute later, he was surrounded by wet, sweet-smelling wipes and was happily pulling out even more!


With all the toddler toy ideas I've found, I came across one where you pull scarves or fabric squares out of a wipes case. Great idea!! I usually buy wipes in a plastic package because the cases are big and bulky. But I had gotten a free sample of cottonelle wipes and they came in a nice little compact-size pop-up container. It's the perfect size for Parker to hold and the hole in the top is a flexible rubber strip so it's also easy to get his little hands inside.


I wasn't sure what to use for fabric... I tried cotton, but it bunched up and the thickness made it hard to pull through. Then I remembered I had some thin, sheer fabric that was left over from our wedding so I got that out. It was soft and really easy to pull through the hole.


Since the squares were just going to be pulled out of a box, I wasn't worried about making them look pretty. I cut out five square-ish shapes and crammed them into the little container. I showed Parker how to pull on the first piece and he quickly yanked it out and reached in for the other ones. How fun!  :)


But I wasn't actually finished. Turns out that the fabric I used frays terribly so after Parker pulled the pieces out a couple times he and the floor were covered in little silver threads. So I needed to hem the edges. Again, I didn't measure anything. I just folded them under twice and sewed a wide, quick hem on all the raw edges.


It only took a few minutes but, as you can see, Parker was a little anxious to have them back to play with!


Wednesday, May 2, 2012

Cup Holder

Every time I give Parker his sippy cup while he's in the stroller the same thing happens. He either gets distracted and drops it, or he decides he's done and tosses it over the side. But either way it ends up spout side down on a dirty floor or sidewalk. That is, WHEN I see it fall. There have been a few times another shopper has kindly informed me my son dropped something. Otherwise I wouldn't have noticed it was missing. And if I don't have wipes or anything to clean the cup, I have to put it away until we get home. Not ideal when you have a thirsty, cranky little boy.   :)

I looked up cup holders, but couldn't find any plastic ones that would attach to our stroller. So I wondered if I could make something out of fabric. Maybe one end would wrap around the cup and the other end would attach to the side of the stroller? Then when Parker tosses it, it wouldn't get lost--it would just hang off the side. I thought it was worth experimenting!

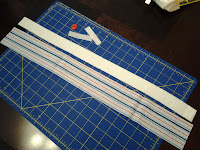
I measured around the narrowest part of the cup, then added enough length that it would hang a few inches off the floor. For our stroller, that ended up being 21 inches long plus seam allowance. I made the width 2.5 inches. I was planning to use a button to fasten it around the cup and I wasn't sure if it would pull too much or tear the fabric, so I also cut a strip of white fleece (22" x 1.25") to sew into the middle to make it a little stronger.


I folded the cotton in half lengthwise and pinned it onto the fleece, then sewed down both sides leaving the ends open. To turn it right way out I attached a safety pin to one end and started threading it through, like you would put elastic in pants. On one end I turned the raw ends in and sewed across. On the other end, I turned the raw ends in and inserted two pieces of velcro, then sewed across a couple times to secure it. The velcro pieces were about 2 inches long and they have to be sewn in so both fuzzy/rough sides are facing up in the same direction. 


Next I put the non-velcro end around the cup and wrapped it snugly around, marking where the button and button hole would need to be placed. And I got to use one of my favorite settings on my sewing machine! I can put the button into the foot and then just let the machine do the work--it measures the button and makes the perfect sized hole needed. Have I mentioned how much I love my new machine?! :)  Lastly I sewed on the button and then I was able to try it out!


I attached it to the stroller and it seemed to be the right length. It doesn't touch the floor but it looks long enough that Parker will be able to hold it easily. And it can also sit in the basket underneath. 


I haven't let Parker try it out yet, so maybe we'll have to go for a walk tomorrow and see what he thinks of it.  :)